# A tibble: 6 × 12
  date                   ws    wd   nox   no2    o3  pm10   so2    co  pm25
  <dttm>              <dbl> <int> <int> <int> <int> <int> <dbl> <dbl> <int>
1 2005-06-23 07:00:00   1.5   250   404   156     4    49    NA  1.81    28
2 2005-06-23 08:00:00   1.5   260   388   145     6    48    NA  1.64    26
3 2005-06-23 09:00:00   1.5   210   404   168     7    58    NA  1.29    34
4 2005-06-23 10:00:00   2.6   240   387   175    10    55    NA  1.29    34
5 2005-06-23 11:00:00   3.1   220   312   125    15    52    NA  1.29    33
6 2005-06-23 12:00:00   3.1   220   287   119    17    55    NA  1.29    35
# ℹ 2 more variables: rollingo3 <dbl>, n_o3 <int>19 Time Series Smoothing
19.1 Calculating rolling means
Some air pollution statistics such as for O3 and particulate matter are expressed as rolling means and it is useful to be able to calculate these. It can also be useful to help smooth-out data for clearer plotting. The rollingMean() function makes these calculations. One detail that can be important is that for some statistics a mean is only considered valid if there are a sufficient number of valid readings over the averaging period. Often there is a requirement for at least 75% data capture. For example, with an averaging period of 8 hours and a data capture threshold of 75%, at least 6 hours are required to calculate the mean.
The function is called as follows; in this case to calculate 8-hour rolling mean concentrations of O3.
Note that calculating rolling means shortens the length of the data set. In the case of O3, no calculations are made for the last 7 hours.
Like selectRunning(), rollingMean() will fail if there are duplicate dates within the data frame; users can again use type = "site" or similar to calculate rolling means for different monitoring stations.
Type ?rollingMean into R for more details.
19.2 Calculating rolling quantiles (percentiles)
There are many reasons why it is useful to calculate a running quantile for time series data. First, it is useful to flexibly show how high or low quantile trends change over time. Second, a low quantile (such as 1 or 2%) can often be useful for determining a ‘background’ concentration. For example, for fast reponse measurements (e.g. at a 1 second resolution) such as that from mobile measurements or fixed location measurements, the background value is often identified using a low quantile rolling measurement (Padilla et al. 2022; Farren et al. 2024).
Padilla, Lauren E., Geoffrey Q. Ma, Daniel Peters, et al. 2022. “New Methods to Derive Street-Scale Spatial Patterns of Air Pollution from Mobile Monitoring.” Atmospheric Environment 270: 118851. https://doi.org/https://doi.org/10.1016/j.atmosenv.2021.118851.
Farren, Naomi J., Sam Wilson, Yoann Bernard, et al. 2024. “An Ambient Measurement Technique for Vehicle Emission Quantification and Concentration Source Apportionment.” Environmental Science & Technology, ahead of print. https://doi.org/https://pubs.acs.org/action/showCitFormats?doi=10.1021/acs.est.4c07907&ref=pdf.
The rollingQuantile function provides a fast way of calculating one or more quantiles in a rime series. The function can also take account of a data threshold so that quantiles are not calculated if there are too few data available in a particular time window.
An example is shown below and plotted in Figure 19.1. In this example, we choose a rolling window width of 744 (about a month) and calculate quantile levels at 0.05 and 0.95. Figure 19.1 shows the jump in NO2 concentrations at the start of 2003 for the high quantile level but not the lower one. As mentioned elsewhere, this increase in NO2 was related to an increase in primary NO2 emissions related to bus aftertreatment technology.
data(mydata) # reload the original data

# calculate quantiles
quantile_data <- rollingQuantile(
  mydata,
  pollutant = "no2",
  width = 744,
  data.thresh = 75,
  probs = c(0.05, 0.95)
)

# look at the data
dplyr::glimpse(quantile_data)
Rows: 65,533
Columns: 13
$ date <dttm> 1998-01-01 00:00:00, 1998-01-01 01:00:00, 1998-01-01 02:00…
$ ws <dbl> 0.60, 2.16, 2.76, 2.16, 2.40, 3.00, 3.00, 3.00, 3.36, 3.96,…
$ wd <int> 280, 230, 190, 170, 180, 190, 140, 170, 170, 170, 180, 190,…
$ nox <int> 285, NA, NA, 493, 468, 264, 171, 195, 137, 113, 100, 109, 1…
$ no2 <int> 39, NA, NA, 52, 78, 42, 38, 51, 42, 39, 34, 38, 41, 42, 49,…
$ o3 <int> 1, NA, 3, 3, 2, 0, 0, 0, 1, 2, 7, 8, 9, 8, 9, 9, 12, 14, 16…
$ pm10 <int> 29, 37, 34, 35, 34, 16, 11, 12, 12, 12, 10, 11, 13, 17, 20,…
$ so2 <dbl> 4.7225, NA, 6.8300, 7.6625, 8.0700, 5.5050, 4.2300, 3.8750,…
$ co <dbl> 3.3725, NA, 9.6025, 10.2175, 8.9125, 3.0525, 2.2650, 1.9950…
$ pm25 <int> NA, NA, NA, NA, NA, NA, NA, NA, NA, NA, NA, NA, NA, NA, NA,…
$ q_no2_0.05 <dbl> NA, NA, NA, NA, NA, NA, NA, NA, NA, NA, NA, NA, NA, NA, NA,…
$ q_no2_0.95 <dbl> NA, NA, NA, NA, NA, NA, NA, NA, NA, NA, NA, NA, NA, NA, NA,…
$ counts <int> 359, 360, 361, 362, 363, 364, 365, 366, 367, 368, 369, 370,…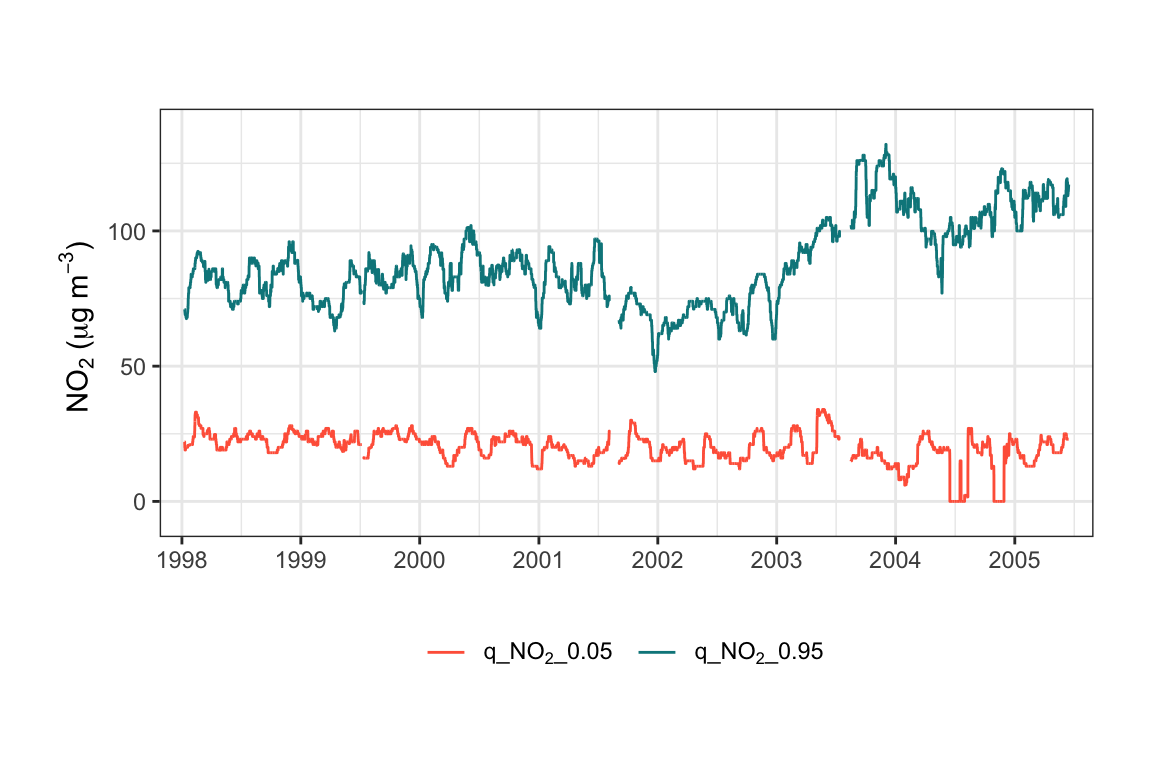
rollingQuantile function to calculate low (0.05) and high (0.95) rolling quantiles.
19.3 Gaussian smoothing
There are numerous ways of smoothing and aggregating time series (and other data). One common and powerful technique is Gaussian smoothing where a Gaussian window slides along the data for each time step and smooths the data. The basic idea is that the smoothing process puts more weight on data close to the time in question and less further away with the weighting being determined by the σ value in the Gaussian equation.
Gaussian smoothing is powerful and flexible and has many advantages over simpler methods such as a moving average. Gaussian smoothing results in a smoother curve, and better preserves trends, and reduced edge artefacts.
In the example shown in Figure 19.2, the data have been plotted as weekly averages to make the raw data easier to see. The smoothed line provides a clear indication of how NO2 concentrations have varied over many years. In this case sigma was set to 744, which corresponds to about one month.
It should be noted GassianSmooth will work with any time series data e.g. at 1 Hz so should be useful for processing noisy fast response data.
data(mydata) # reload the original data

gauss_smooth <- GaussianSmooth(
  mydata,
  pollutant = "no2",
  sigma = 744
)

# show the data
dplyr::glimpse(gauss_smooth)
Rows: 65,533
Columns: 12
$ date <dttm> 1998-01-01 00:00:00, 1998-01-01 01:00:00, 1998-01-01 02:00…
$ ws <dbl> 0.60, 2.16, 2.76, 2.16, 2.40, 3.00, 3.00, 3.00, 3.36, 3.96,…
$ wd <int> 280, 230, 190, 170, 180, 190, 140, 170, 170, 170, 180, 190,…
$ nox <int> 285, NA, NA, 493, 468, 264, 171, 195, 137, 113, 100, 109, 1…
$ no2 <int> 39, NA, NA, 52, 78, 42, 38, 51, 42, 39, 34, 38, 41, 42, 49,…
$ o3 <int> 1, NA, 3, 3, 2, 0, 0, 0, 1, 2, 7, 8, 9, 8, 9, 9, 12, 14, 16…
$ pm10 <int> 29, 37, 34, 35, 34, 16, 11, 12, 12, 12, 10, 11, 13, 17, 20,…
$ so2 <dbl> 4.7225, NA, 6.8300, 7.6625, 8.0700, 5.5050, 4.2300, 3.8750,…
$ co <dbl> 3.3725, NA, 9.6025, 10.2175, 8.9125, 3.0525, 2.2650, 1.9950…
$ pm25 <int> NA, NA, NA, NA, NA, NA, NA, NA, NA, NA, NA, NA, NA, NA, NA,…
$ smooth_no2 <dbl> 46.71299, 46.71691, 46.72072, 46.72449, 46.72833, 46.73229,…
$ n_no2 <int> 2149, 2150, 2151, 2152, 2153, 2154, 2155, 2156, 2157, 2158,…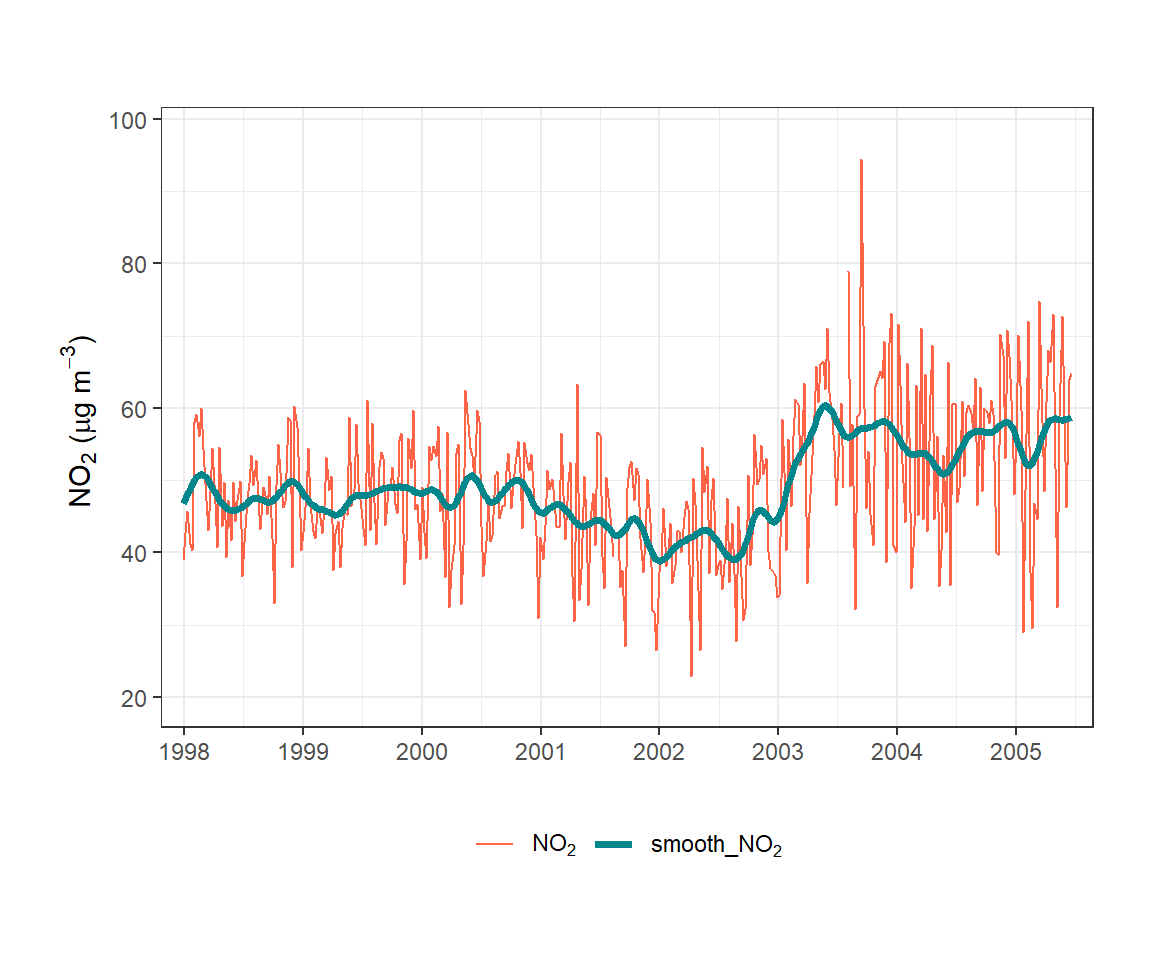
GassianSmooth function to smooth NO2 concentrations with sigma set at about 1 month.
19.4 Whittaker-Eilers smoothing
19.4.1 Background
The Whittaker-Eilers smoother (Eilers 2003) is a powerful and flexible method for smoothing and interpolating time series data. The method is based on penalised least squares: it seeks a smooth series that is close to the observed data while penalising roughness (i.e., large differences between adjacent values). The balance between fidelity to the data and smoothness is controlled by a single parameter lambda — larger values produce smoother results.
Key advantages of the Whittaker-Eilers approach over simpler methods such as a moving average include:
- It handles missing values (
NA) naturally, interpolating across gaps without requiring imputation. - It is computationally efficient even for long time series (Eilers 2003).
- The order of the roughness penalty
dcan be varied:d = 2(the default) penalises curvature,d = 1penalises slope and effectively performs linear interpolation across gaps. - The
lambdaparameter gives direct, intuitive control over the degree of smoothing.
Eilers, Paul H. C. 2003. “A Perfect Smoother.” Analytical Chemistry 75 (14): 3631–36. https://doi.org/10.1021/ac034173t.
19.4.2 Standard smoothing
The simplest use of WhittakerSmooth() is to produce a smoothed version of a pollutant time series. In the example below, NO2 concentrations are smoothed with lambda = 2000. The function adds a new column smooth_no2 to the data frame.
Where the aim is to reduce noise, setting lambda = NA will use Generalised Cross Validation (GCV) to choose an optimal lambda value automatically, though this can be computationally expensive for large datasets. However, for smoothing purposes, it is often more useful to experiment with a range of lambda values to find one that produces a result that is consistent with the aims of smoothing data in the first instance.
mydata_smooth <- WhittakerSmooth(
  mydata,
  pollutant = "no2",
  lambda = 2000
)
dplyr::glimpse(mydata_smooth)
Rows: 65,533
Columns: 11
$ date <dttm> 1998-01-01 00:00:00, 1998-01-01 01:00:00, 1998-01-01 02:00…
$ ws <dbl> 0.60, 2.16, 2.76, 2.16, 2.40, 3.00, 3.00, 3.00, 3.36, 3.96,…
$ wd <int> 280, 230, 190, 170, 180, 190, 140, 170, 170, 170, 180, 190,…
$ nox <int> 285, NA, NA, 493, 468, 264, 171, 195, 137, 113, 100, 109, 1…
$ no2 <int> 39, NA, NA, 52, 78, 42, 38, 51, 42, 39, 34, 38, 41, 42, 49,…
$ o3 <int> 1, NA, 3, 3, 2, 0, 0, 0, 1, 2, 7, 8, 9, 8, 9, 9, 12, 14, 16…
$ pm10 <int> 29, 37, 34, 35, 34, 16, 11, 12, 12, 12, 10, 11, 13, 17, 20,…
$ so2 <dbl> 4.7225, NA, 6.8300, 7.6625, 8.0700, 5.5050, 4.2300, 3.8750,…
$ co <dbl> 3.3725, NA, 9.6025, 10.2175, 8.9125, 3.0525, 2.2650, 1.9950…
$ pm25 <int> NA, NA, NA, NA, NA, NA, NA, NA, NA, NA, NA, NA, NA, NA, NA,…
$ smooth_no2 <dbl> 50.75965, 49.77722, 48.78892, 47.78885, 46.77115, 45.73203,…Figure 19.3 shows the first 744 hours (approximately one month) of raw and smoothed NO2 data. The Whittaker smoother closely tracks the data while removing short-term noise, making the underlying variation much easier to interpret.
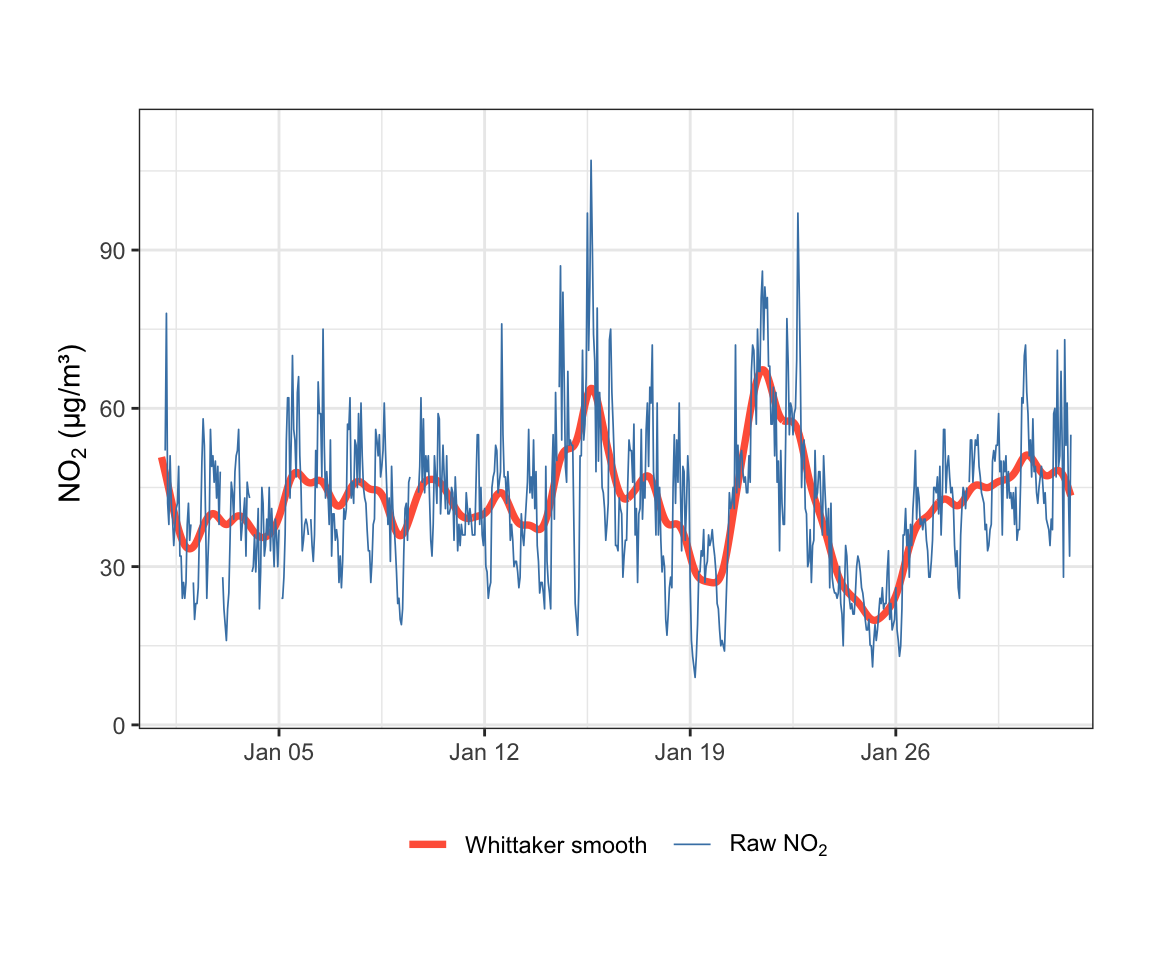
mydata. Lambda was set to 20.
The lambda value can be increased substantially for longer time series spanning many years. Because smoothing a multi-year hourly record requires much greater regularisation, values in the range lambda = 1e6 to lambda = 1e10 are often appropriate. If lambda = NA, Generalised Cross Validation (GCV) is used to choose lambda automatically, though this can be computationally expensive for large datasets.
A major advantage of the Whittaker-Eilers approach is that a user can confidently “set and forget” their lambda value. Because lambda acts as an absolute penalty, the local smoothing characteristics will remain identical regardless of how much new data is appended to the series; as a time series grows, the Whittaker smooth will always deliver a predictable, consistent outcome. In contrast, methods like LOESS (locally-weighted regression) or GAMs often rely on a relative span or fraction of the total data. To maintain that same visually and mathematically consistent smoothing effect as a dataset expands, users of those methods must constantly recalculate and shrink their smoothing parameters.
19.4.3 Baseline estimation
Beyond smoothing, WhittakerSmooth() can be used for baseline estimation via Asymmetric Least Squares (ALS) by supplying the p argument. When p is set to a small value (e.g., 0.01), the smoother is asymmetrically penalised: it is strongly discouraged from rising above the data but not from falling below it. This forces the smooth curve to track the lower envelope of the time series — the background or baseline — rather than the central tendency.
The function returns two new columns:
-
<pollutant>_baseline: the estimated background concentration. -
<pollutant>_increment: the difference between the observed concentration and the baseline, representing the local enhancement above background.
This decomposition is particularly useful in air pollution studies, where it is common to want to separate a background component (e.g., regional or photochemical NO2) from local increments (e.g., fresh traffic emissions). The increment can then be used as the basis for further analysis such as polar plots or wind roses to identify source directions.
The question arises as to what the best lambda value is for baseline estimation. To a large extent, the value of lambda will depend on the specific application and the desired balance between smoothness and fidelity to the data. For baseline estimation, it is often desirable to use a larger lambda value than for general smoothing to ensure that the baseline is sufficiently smooth and does not track short-term fluctuations in the data.
The parameter \(\lambda\) directly regulates the filter’s cutoff frequency (\(\omega_c\)), where the filter cuts the power of the signal in half. It can be shown that for a time series with a sampling frequency of 1 hour, the relationship between \(\lambda\) and the cutoff period \(T_c\) (in hours) is given by:
\[ \lambda = \left[ 2 \sin\left(\frac{\pi}{T_c}\right) \right]^{-2d} \]
As an example, it is often desirable to suppress the diurnal cycle when estimating a background for hourly data. The diurnal cycle has a period of 24 hours, so setting \(T_c = 24\) hours would be a natural choice. However, because the Whittaker smoother is not a sharp filter, it may be necessary to use a larger \(T_c\) (and thus a larger \(\lambda\)) to ensure that the diurnal cycle is sufficiently attenuated. Table 19.1 provides some example \(\lambda\) values for different cutoff periods.
| Target Cutoff Period (\(T_c\)) | Physical Meaning | Calculated \(\lambda\) Value |
|---|---|---|
| \(T_c = 24\) hours | Starts attenuating the diurnal cycle | \(\lambda \approx 215\) |
| \(T_c = 48\) hours (2 days) | Mostly suppresses the diurnal cycle | \(\lambda \approx 3400\) |
| \(T_c = 72\) hours (3 days) | Thoroughly flattens out daily variations | \(\lambda \approx 17300\) |
| \(T_c = 96\) hours (4 days) | Clean, ultra-smooth synoptic background | \(\lambda \approx 54800\) |
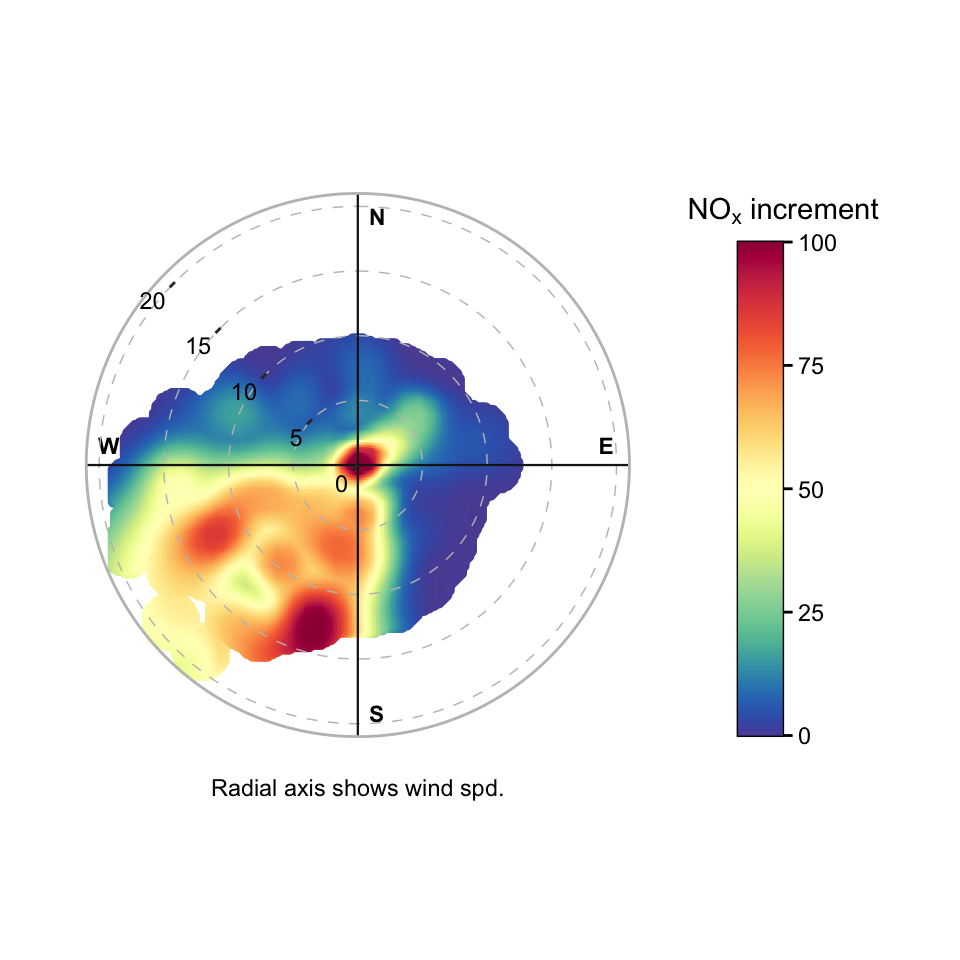
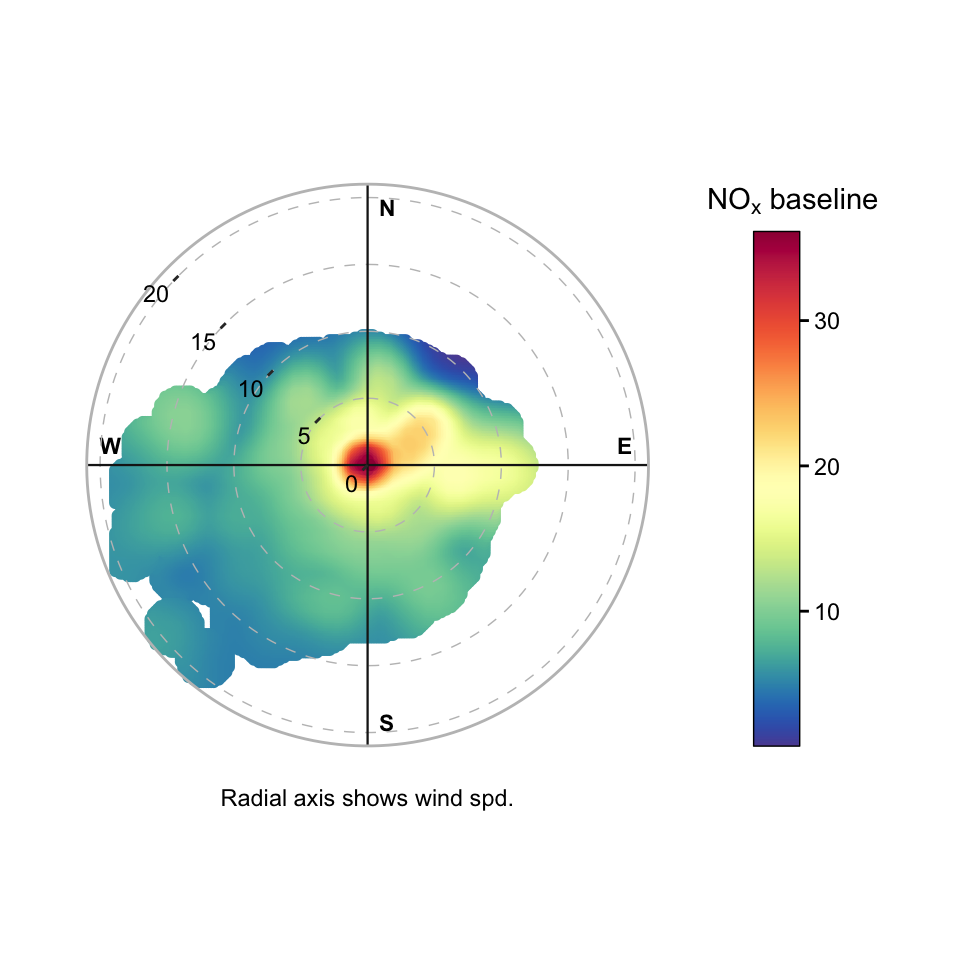
As an example of the application of baseline smoothing, it is useful to consider a site affected by different sources. The London Heathrow site (LHR2 in the Air Quality England Network) is influenced by a clear airport source to the south (the northern runway is about 200 m to the south), a road immediately to the north, and a more regional background component from Greater London to the east. The airport source has the same sort of pattern each day. It is useful therefore to use the WhittakerSmooth() function to estimate the background and then to use the increment for further analysis such as polar plots to identify the source directions.
The data can be accessed as follows:
lhr2 <- readr::read_rds(
  "https://github.com/openair-project/book/raw/refs/heads/main/assets/data/lhr2_2019_2025.rds"
)
Next we calculate the baseline and increment for NOx using WhittakerSmooth() with lambda = 3000 to suppress the diurnal cycle.
lhr2 <- WhittakerSmooth(
  lhr2,
  pollutant = "nox",
  lambda = 3000,
  p = 0.01
)
Finally, we can separately plot the baseline and increment to show how they differ. Figure 19.4 shows polar plots of the NOx increment and baseline. The increment plot clearly shows the airport source to the south and the road source to the north. The airport source shows elevated concentrations at high wind speeds and the road source shown by the feature in the middle of the plot at low wind speeds. By contrast, the baseline plot shows a more regional background with a slight enhancement from the east (Greater London) and a wider influence of ground level sources at low wind speeds. However, the most striking feature of the baseline plot is the absence of the airport source, which is clearly visible in the increment plot. This illustrates how the Whittaker-ALS approach can effectively separate a local source from a background, allowing for clearer interpretation of source contributions and their directional characteristics. A similar approach can be used at other sites where there is interest in extracting the influence of locally-dominant sources, using the defaults used in the code above.
Although not shown, it is useful to use timeVariation() to check that the baseline has successfully removed the diurnal cycle. If the diurnal cycle is still present in the baseline, it may be necessary to increase lambda further to ensure that the diurnal cycle is sufficiently suppressed.
19.4.4 Comparison with rolling low quantiles
A common alternative approach for estimating a background is to use a rolling low quantile (e.g., the 1st percentile over a sliding window). Figure 19.5 compares the Whittaker baseline with a 1st-percentile rolling quantile computed over a 50-hour window.
WhittakerSmooth(
  mydata,
  pollutant = "no2",
  lambda = 2000,
  p = 0.001
) |>
  rollingQuantile(
    pollutant = "no2",
    width = 50,
    probs = 0.01
  ) |>
  slice_head(n = 500) |>
  timePlot(
    pollutant = c("no2_baseline", "q_no2_0.01", "no2"),
    group = TRUE,
    linewidth = c(1, 1, 0.4),
    ylab = "NO2 (µg/m3)",
    cols = "tol.bright",
    name.pol = c("Whittaker", "Rolling Quantile", "Raw NO2 data")
  )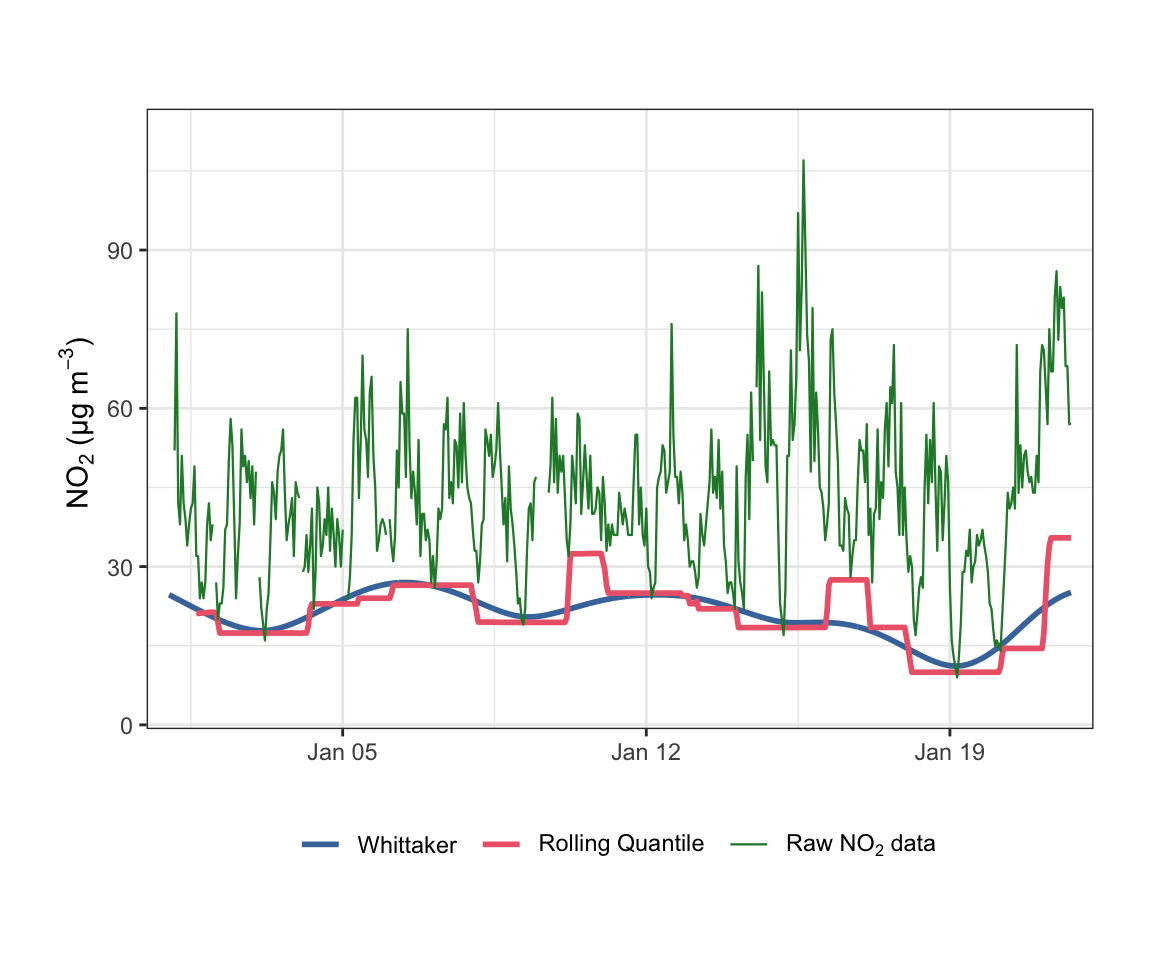
mydata. The Whittaker baseline varies smoothly and continuously, while the rolling quantile produces a stepped series.
As Figure 19.5 illustrates, the rolling quantile produces a stepped, discontinuous baseline that can change abruptly as observations enter or leave the rolling window. By contrast, the Whittaker baseline varies smoothly and continuously, which is more physically plausible for a background concentration and produces better-behaved increments for downstream analysis. The Whittaker approach also handles missing data naturally, whereas gaps can distort the effective window length for rolling statistics.
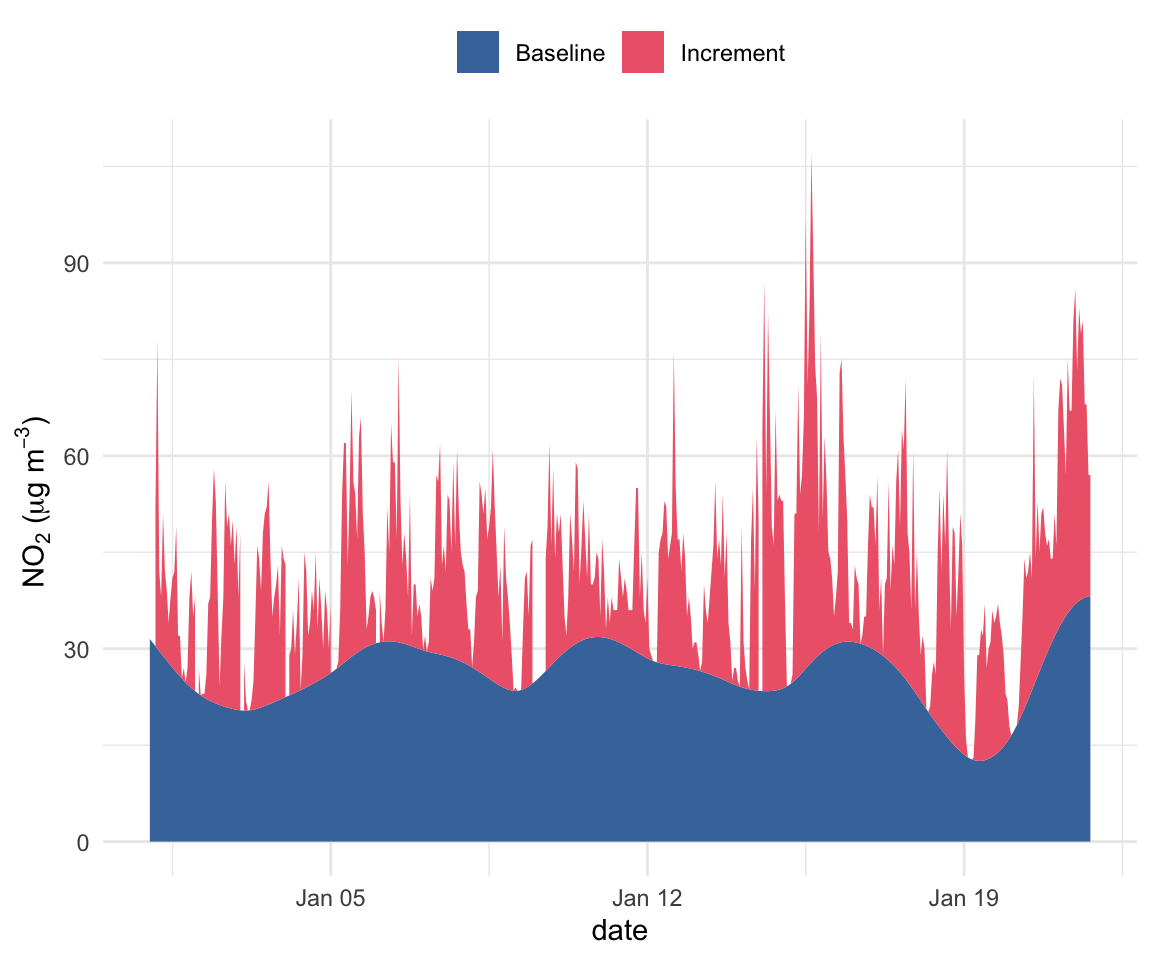
Finally, we can use ggplot2() to show the increment and baseline filled, which can help to better visualise each contribution, shown in Figure 19.6.
WhittakerSmooth(
  mydata,
  pollutant = "no2",
  lambda = 2000,
  p = 0.01
) |>
  slice_head(n = 500) |>
  mutate(no2_increment = pmax(0, no2 - no2_baseline)) |>
  ggplot(aes(x = date)) +
  geom_ribbon(aes(ymin = 0, ymax = no2_baseline, fill = "Baseline")) +
  geom_ribbon(aes(
    ymin = no2_baseline,
    ymax = no2_baseline + no2_increment,
    fill = "Increment"
  )) +
  scale_fill_manual(
    values = c("Baseline" = "#4477AA", "Increment" = "#EE6677")
  ) +
  labs(y = quickText("no2 (ug/m3)"), fill = NULL) +
  theme_minimal() +
  theme(legend.position = "top")